
Source: ImageFlow/Shutterstock.com
Knowing how to tile a shower is an essential skill for professionals and imaginative do-it-yourselfers alike. With the ability to transform a room from drab to luxe, a fully tiled stand-up shower is aesthetically pleasing and long-lasting. Tile is an obvious choice in wet environments because it’s impervious to water and stains, and we all know that’s crucial in the water closet.
Required Supplies and Tools for Tiling a Shower Wall
Learning how to tile a shower is not hard, but you do need to know the basics up-front. Before you get started, make sure you have the right tiling tools in your arsenal. Here are the tools required.
1. Safety and Cleaning Items – Make sure to stock up on the following cleaning items and safety essentials, especially if the job involves removing old tiles or cutting new ones, which can be quite messy:
- Eye protection
- Respirator mask
- Drop cloth
- Plastic sheeting
- Broom or vacuum
- Sponge and bucket
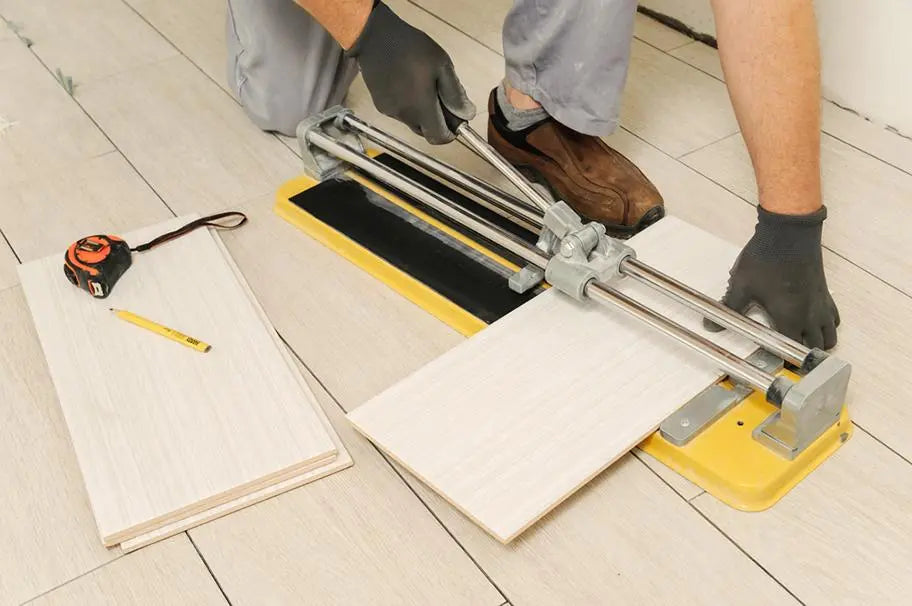
2. Tile Cutter – If it’s a fairly straightforward job involving porcelain or ceramic tiles, a manual tile cutter is the way to go. However, if you plan on using a natural stone tile such as marble or granite, a wet tile saw is the best choice.
3. Tile Nippers – Have a pair of tile nippers on hand for make small, controlled cuts. These can help you attack cuts that are too big for your cutter or saw.
Source: DUO Studio/Shutterstock.com
4. Hole Saw – You may also need a hole saw, depending on the demands of the job. These handy tile saws create perfect holes for hardware, plumbing, etc.
5. Notched Trowel – You’ll need a couple of good notched trowels in your toolkit to apply a consistent amount of mortar to each tile.
6. Thinset Mortar – This essential tile adhesive is made of cement, fine sand, and water mixed with polymer to create a strong bond. When mixing mortar, aim for a thin, peanut-butter-like consistency.
7. Grout, Acidic Cleaner, and Sealer – In addition to grout in the color of your choice, you’ll also need to use an acidic cleaner to get rid of any lingering haze, as well as a spray-on grout sealer and sealant to complete the job.
8. Rubber Float and Wet Sponge – A high-quality rubber float will help you apply grout evenly. You’ll need a wet sponge to clean off the excess.
9. Spacers and Wedges – Use tile spacers to keep the tile separated while they dry and to ensure consistently between gaps.
Tips for Tiling a Shower
Make sure you know a few of the most important shower tiling tips before diving in. These tips can help ensure that your project stays within deadline and under budget. Most importantly, they ensure that it comes out looking fantastic.
- Use a pre-made base. A tile-ready shower base, otherwise known as a shower foundation, is a simple solution that allows you to build a custom shower quickly. They are pre-sloped bases that are designed to be installed and waterproofed one day, and then tiled the next day.
- Think about water. The biggest difference between tiling a shower and tiling anything else is that the shower needs to be resistant to water. Make sure everything you use to prepare the wall—including the backer board and the barrier around it—are waterproof or water-resistant.
- Monitor mortar application. After the first tile or segment has been pressed into the pre-spread mortar on the wall, fully remove it and inspect to make sure the mortar is evenly coated all over the backs of the tiles.
- Plan your layout first. To plan the perfect tiling pattern, start by centering a single tile along the length of each wall and building your design around it. This will help you avoid making tiny cuts of tile at the edges of the wall.
- Use guides. We always recommend drilling a thin board into the wall to act as a guide to install each row of tiles evenly. You can easily remove the guide with each completed wall and move it to the next. Just make sure to fill the screw holes with a waterproof membrane before tiling over the area.
- Practice. As with any skilled labor endeavor, tiling a shower takes a lot of practice. You can practice your technique on an old piece of furniture.
Source: StudioDin/Shutterstock.com
Tile Like a Pro
With the right set of tools and know-how, you’ll be able to tile a shower like a pro, even if it’s your first attempt. Make sure to take a few practice laps before diving in and don’t be afraid to watch a few tutorials online. For all your tiling supplies and tools, trust the team here at Contractors Direct. We are happy to help you find what you need.